
A girlfriend for the penguin from day 2 - the only repetition Amy and I allowed ourselves on the advent calendar punch art!
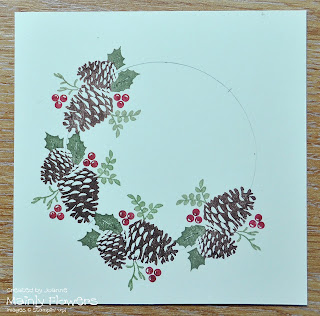
I didn't get time today to do the photos for the step by steps for days 12 and 13, but haven't forgotten them. In the meantime, another Christmas card made using the Pines and Poinsettias stamp set, and something for which I already have the step by step photos done!

Card Base: 21cm x 10.5cm Cherry Cobbler folded in half across the width.
Image panel: Very Vanilla 10cm x 10cm
Cherry Cobbler Seam Binding approx 20cm - 25cm long
Stamp Sets: Pines & Poinsettias and Pennant Parade (for the ‘merry’)
If desired, you can add a tiny spot of Crystal effects to each holly berry and to the red dot on the tags - as has been done on this card. Be sure to keep the dots very small, and to keep them well apart from each other so that they don’t spread and merge together. Also, allow a few hours drying time before handling.
Here is how I stamped the wreath:

Draw a 6.5cm diameter circle lightly in pencil in the centre of the Vanilla piece. A Stampin’ Up! embellishment pot is exactly the right size for this.

Use Cherry Cobbler, Always Artichoke, Wild Wasabi and Chocolate Chip markers to colour the pinecone image, and stamp the image over the pencil line so that the line goes between the two holly leaves and through the centre of the tip of the pine cone as shown in this close up.

Stamp the image again at the opposite side of the circle. Keep all the pine cones facing in the same direction around the circle, so that the leafy sprigs all face into the centre.
Stamp two more images in the gap on one side. You may find that a small mark on the circle half way between the first two pine cone images may help you with placement.
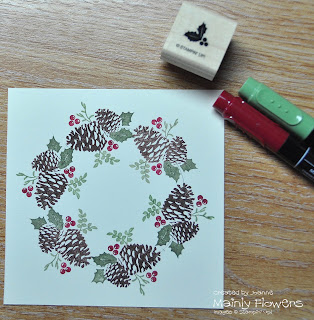
Finish off the wreath with two more images on the second side.
Using the little holly sprig stamp, stamp one sprig in each gap between the pinecone images around the outside of the wreath.

Here is the finished wreath.
Once the ink is completely dry - erase all the pencil lines.
Ink the edges of the panel with Wild Wasabi (not shown in this image).
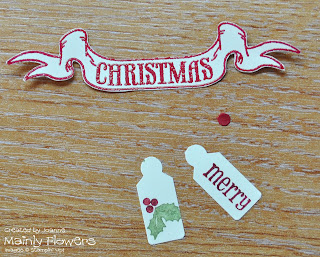
On a scrap of Vanilla card, stamp the banner greeting in Versamark and then heat emboss with Cherry Cobbler embossing powder. Wiping over the card first with an Embossing Buddy will give a crisper finish to the embossed image, and also stop any stray pieces of powder clinging where you don’t want them. Cut out the banner.
Stamp the little holly sprig, and also the merry greeting from Pennant Parade onto a scrap of Vanilla, and punch out using the Jewelry Tag Punch. Punch a circle of Cherry Cobbler using the small hole of the Cropadile.

Ink the edges of the tags, and stick together as shown in the picture.
The banner has been curled, and has two dimensionals stacked together in the middle behind to help hold the shape on the card. The tags are also on a dimensional.
Assemble the card as shown in the first image, finishing with a Cherry Cobbler Seam Binding bow fixed on using glue dots.


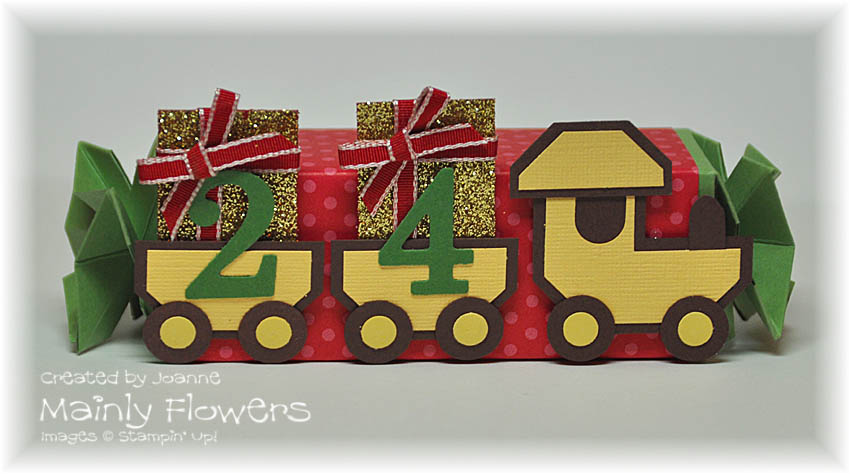 I had a larger chocolate to put in number 24, so made an extended version of the Candy Wrapper Die so that I could fit it in. My daughter said when we were making the punch art that she would like presents on the last box. I had wanted to include a train, but the other boxes were too short - so a present carrying train was the combined idea for the last box!


