I had a larger chocolate to put in number 24, so made an extended version of the Candy Wrapper Die so that I could fit it in. My daughter said when we were making the punch art that she would like presents on the last box. I had wanted to include a train, but the other boxes were too short - so a present carrying train was the combined idea for the last box!
The presents are just rectangles of card, glittered with gold using Heat'n'stick powder, and wrapped with short lengths of ribbon and a bow stuck on top.
The engine and trucks are made using the two Tag punches, with some small circles for wheels. I used the Word Window punch to create the train window.
I've added this to the list of step-by-steps to do after Christmas!
Wishing all my blog readers a very happy Christmas! See you in the New Year.
Saturday, 24 December 2011
Friday, 23 December 2011
Candy Wrapper Advent Calendar # 23
Just some simple baubles for number 23 - made using the Ornament punch, and re-punching to make them slimmer. A little bit of texture added by embossing one, and pricking and scoring lines on the other (the lines don't show up in the photo, but are top and bottom of the row of holes). I also sponged the edges, and curved the pieces slightly using my bone folder before spritzing with some home made shimmer spray to add some twinkle.
Last one tomorrow!
Last one tomorrow!
Thursday, 22 December 2011
Quick Catch-Up on the Advent Calendar Boxes
Well, I have presents bought and wrapped, food and menus organised, and house nearly tidy (ish!) with a whole two days to spare (most unlike me) - so have a little time to pop on photos of the last week's advent boxes that I missed. I had planned to keep up with one every day, but sadly failed in that!
This is just photos - I'll have to come back and do step by steps after Christmas.
Wednesday, 14 December 2011
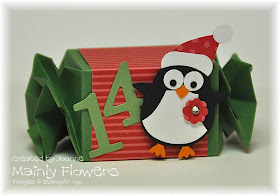
Candy Wrapper Advent Calendar # 14
A girlfriend for the penguin from day 2 - the only repetition Amy and I allowed ourselves on the advent calendar punch art!
I didn't get time today to do the photos for the step by steps for days 12 and 13, but haven't forgotten them. In the meantime, another Christmas card made using the Pines and Poinsettias stamp set, and something for which I already have the step by step photos done!
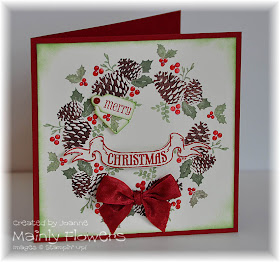
Card Base: 21cm x 10.5cm Cherry Cobbler folded in half across the width.
Image panel: Very Vanilla 10cm x 10cm
Cherry Cobbler Seam Binding approx 20cm - 25cm long
Stamp Sets: Pines & Poinsettias and Pennant Parade (for the ‘merry’)
If desired, you can add a tiny spot of Crystal effects to each holly berry and to the red dot on the tags - as has been done on this card. Be sure to keep the dots very small, and to keep them well apart from each other so that they don’t spread and merge together. Also, allow a few hours drying time before handling.
Here is how I stamped the wreath:
Draw a 6.5cm diameter circle lightly in pencil in the centre of the Vanilla piece. A Stampin’ Up! embellishment pot is exactly the right size for this.
Use Cherry Cobbler, Always Artichoke, Wild Wasabi and Chocolate Chip markers to colour the pinecone image, and stamp the image over the pencil line so that the line goes between the two holly leaves and through the centre of the tip of the pine cone as shown in this close up.
Stamp the image again at the opposite side of the circle. Keep all the pine cones facing in the same direction around the circle, so that the leafy sprigs all face into the centre.
Stamp two more images in the gap on one side. You may find that a small mark on the circle half way between the first two pine cone images may help you with placement.
Finish off the wreath with two more images on the second side.
Using the little holly sprig stamp, stamp one sprig in each gap between the pinecone images around the outside of the wreath.
Here is the finished wreath.
Once the ink is completely dry - erase all the pencil lines.
Ink the edges of the panel with Wild Wasabi (not shown in this image).
On a scrap of Vanilla card, stamp the banner greeting in Versamark and then heat emboss with Cherry Cobbler embossing powder. Wiping over the card first with an Embossing Buddy will give a crisper finish to the embossed image, and also stop any stray pieces of powder clinging where you don’t want them. Cut out the banner.
Stamp the little holly sprig, and also the merry greeting from Pennant Parade onto a scrap of Vanilla, and punch out using the Jewelry Tag Punch. Punch a circle of Cherry Cobbler using the small hole of the Cropadile.
Ink the edges of the tags, and stick together as shown in the picture.
The banner has been curled, and has two dimensionals stacked together in the middle behind to help hold the shape on the card. The tags are also on a dimensional.
Assemble the card as shown in the first image, finishing with a Cherry Cobbler Seam Binding bow fixed on using glue dots.
Tuesday, 13 December 2011
Candy Wrapper Advent Calendar # 13
Monday, 12 December 2011
Candy Wrapper Advent Calendar # 12
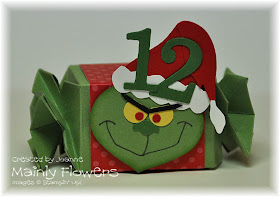
The Grinch is very naughty - he stole Amy's chocolate from number 12 and hid it somewhere else. Fortunately Mummy saw him, and left a trail of post-it note clues to the place where he left it. Not initially my plan - but one of the chocolates I had wouldn't fit in the box, so came up with this idea when I thought to put the Grinch on one of the boxes. Went down well this morning!
His head is punched from Wild Wasabi card using the Ornament punch and the edges sponged with Wild Wasabi ink. His mouth is hand drawn with a Basic Gray marker. His nose is punched from Garden Green card using the Modern Label punch, and then trimmed to make this nose shape with scissors. Basically I just played around until I came up with something passably like a Grinch nose!
The eyes are 3/8" circles from So Saffron, with eyebrows made using slivers of black trimmed to a point at one end. I stuck them across the yellow circles, and cut off the portion sticking above the eyebrow. The pupils are 1/8" circles of Real Red card.
His hat is punched using the large petal from the Blossom Petal punch, and the folded over end started life as the body from the Bird Builder punch, which I trimmed to shape with scissors. The white parts of his hat were just cut freehand with scissors - again playing around until something useful appeared!
I will do a photo step by step when I get chance - it will probably be in a couple of days. In the meantime another Christmas card, seeing as I haven't posted many in the last few weeks!
Card/Paper: Chocolate Chip, Wild Wasabi, Very Vanilla and Holly Berry Bouquet DSP
Ink: Chocolate Chip, Wild Wasabi, Garden Green, Cherry Cobbler
Stamps: Pines & Poinsettias and Contempo Christmas for the greeting
Other: Designer Frames Embossing folder, Eyelet Border Punch, Corner Rounder Punch, Large Oval Punch, Cherry Cobbler Seam Binding Ribbon
Card Size: 15cm x 10.5cm (approx 4" x 6")
Candy Wrapper Advent Calendar # 11
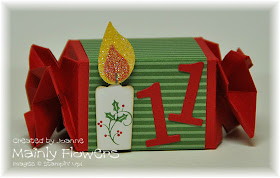
Yesterday got away from me, so number 11 is a day late! Just a simple little candle for this one, made from the Modern Label punch. I cut an end off, and stamped it with an image from the Tags 'Til Christmas set. Then sponged around the edges with crumb cake ink, and shaped it very slightly with the long edge of my bone folder on my pricking mat. It's stuck onto the box with a couple of dimensionals just down the centre, so that the edges can curve backwards still.
The flame is made from two bird wings from the Bird Builder punch. I trimmed down the orange wing with my scissors, stuck it onto the yellow wing, and then used the fine end of my black marker to draw in a wick. I then used Versamark, Heat'n'Stick and Dazzling Diamonds to glitter the flame. Finally I mounted it onto the box with a dimensional.
Here is the promised tutorial on how to make the little elf from the last post - day 10. I made a mistake when I posted the dimensions of some of the circles, so have corrected them in the day 10 post, as well as putting the correct measurements here:
Punch a 1 1/4" and 3/8" circles from Pink Pirhouette, also two part bird wings as shown in the photo. Sponge all the edges with Blushing Bride ink. Punch two 1/4" circles from Whisper White, and two 1/8" circles from Basic Black.
Stick the parts of the face together as shown, and draw a mouth using the fine end of a Real Red marker.
Punch the largest petal shape out of Wild Wasabi DSP. Punch a segment of a 1 3/4" circle from Real Red card, and stick it on to the petal as shown in the photo.
Use the 1 3/4" circle punch and punch away the bottom portion of the hat assembly as shown in the photo. I attached a post-it note to use as a handle. I stuck the post-it note on with the point marking the middle top of the lower edge of the hat brim - that way I could see where to punch.
Lay the hat in position on the head, so that the lower edge of the hat brim meets the point where the top edge of the ears join the head - as marked with the arrows above.
Carefully pick up both pieces, holding them in position together. Draw a line on the hat brim above the ears. Remove the hat and cut along this line. Turning both pieces to the front again, check that the shape of the hat brim over the ears is as you want - on my elf here, I did a little bit extra trimming to shorten the outer tips of the hat brim, and to make it look more like it's going over and behind his ears. When you are satisfied stick the hat onto the elf's head.
Add a 3/8" circle of Real Red to the point of the hat. For this elf, I have also stuck another circle of red on the back so that the tip of the hat is sandwiched between the two circles. This is because the hat sticks up above the edge of the advent calendar box, and it makes it a bit more sturdy for handling. If I was going to stick it flat on a card I wouldn't bother with the second circle.
Finally punch out a 1 3/8" circle of Wild Wasabi, attach a post-it note handle and insert the shape into the Scalloped Oval punch, and punch to create the scalloped shoulder piece. Stick behind his chin.
Wednesday, 7 December 2011
Candy Wrapper Advent Calendar # 10
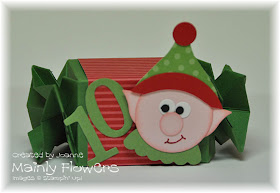
Number 10 is a little elf. I haven't had time today to do a photo how to on making him - maybe tomorrow . .. but briefly he was made using a 1 1/4" circle punch for his head. A 1 3/8" circle for his shoulders, which has been punched again using the Scalloped Oval punch to give the scallops on the bottom edge. His ears are the wing from the Bird Builder punch.
His hat is punched from dsp using the largest petal in the Blossom Petal punch, with the brim punched using a 1 3/4" circle punch. 3/8" circles for the hat bobble, and for his nose. 1/4" and 1/8" circles for his eyes.
EDITED TO ADD: I have now done the tutorial, which is on the next post here.
I thought I would pop on a Christmas card as well:
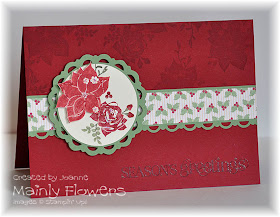
This is one that I designed for a recent stampers ten project pack. It uses the Pines and Poinsettias stamp set, and the Holly Berry DSP. I stamped the rose & poinsettia stamp in Versamark as a background on the top half of the Cherry Cobbler card base, and embossed the greeting (from Curly Cute) with clear embossing powder at the bottom.
I die cut the circle for the image panel, and then inked up the rose and poinsettia stamp using my markers and used the Stamp-a-ma-jig to stamp it onto the circle. I then stamped another poinsettia image onto a scrap of card, cut it out and popped it onto the main image with dimensionals. The scalloped mat behind the main image is cut using the Perfect Pennants die.
You can't see in the photo, but the white areas of the flowers have been glittered with Dazzling Diamonds, so the image has a pretty twinkle to it which brings the card alive.
Candy Wrapper Advent Calendar # 9
A little gingerbread man on number nine.
I have seen various gingerbread punch art characters on the internet, but all of them too big for what I wanted, so I designed my own little chap!
I started with a scalloped circle punched out of Soft Suede card.
I attacked the scalloped circle with my Word Window punch. First punching out the bottom scallop, and then punching out on each side of the top scallop - going in a bit further for these two punches.
Next I used my 1 3/8" circle punch to take out three scallops on each side. This creates the body shape with a tab for the head to go on.
I stuck on a 3/4" circle for his head.
I snipped a bow tie shape from a scrap of Real Red card, and added a 1/8" circle in the middle.
Finally I drew in the details using a white gel pen. When the ink was completely dry, I drew in the pupils in with a black marker.
Candy Wrapper Advent Calendar # 8
A mini Christmas wreath today. This is a little fiddly, but doesn't take long to make.
Punch out a 1 1/4" circle from a piece of Garden Green, leaving some space around it.
Punch around the circular hole with the Scalloped Circle punch.
Using the pricking mat from the Mat Pack, shape the scallops with an embossing stylus by embossing in small circles on each scallop.
Punch out 14 mini flowers - here I've used the flower punch from the Bitty Shapes Punch Pack. Emboss each petal of the flower.
Then turn the flower over and emboss in the centre.
Place a small spot of glue to one side of a scallop, and place a flower on it, so that the flower is tilted on to one side.
Repeat with all of the flowers until the ring is filled.
Punch out 20 x 1/8" circles. I used the retired 1/8" hand held punch from SU. Place a small blob of glue in the centre, and then place three circles on top as shown in the photo.
Place a good blob of glue on the wreath as in the photo, and gently place a group of berries on top. Don't press down on the berries, in order to avoid the glue squelching out from underneath!
Finally use a glue dot to fix on a small bow. Here I have used the 1/8" Real Red taffeta ribbon.